Tuesday, December 4, 2012

Getting the Steam Up: Part 2 Predreadnoughts

Rescaled plan of the HMS London...the original scan from Janes Fighting Ships 1905-6 is on the upper left, the rescaled version is on the right.
 Much-inspired by some great links sent to me after my recent post on some homemade pre-dreadnoughts I have moved into a "Homemade pre-dreadnoughts Mark II" phase. In particular, I am enjoying the look of the really cool pre-dreadnoughts on the "Old Admirals" blog, and Bob Cordery's stylized wooden predreadnoughts. I decided my small scale pre-dreads were a bit too small and I was taken with the idea that the ships could be larger and carry a bit more detail while remaining entirely scratchbuilt from inexpensive materials and, most importantly, quickly built.
SMS Brandenburg
 My approach was to take original scans from a copy of Janes Fighting Ships 1905-6 that I recently got on ebay (for a really great price) and manipulate the scanned image to give me a new template on which to base the hull shape. I wanted a more abstract look to the models, and just a bit stylized so I settled on a 1.5 inch width by about a 5 inch length to make my battleships. This size would work with 4" or 5" hexes and give me the look and the size that would allow some more complex detailing on the models. Most importantly I could use round toothpicks and readily available wood shapes for turrets and gun barrels and everything would still look believable to the eye. So the scanned image was resized in Adobe "InDesign" to get the shape that I was looking for...so shorter length and wider beam was the watchword.
HMS London
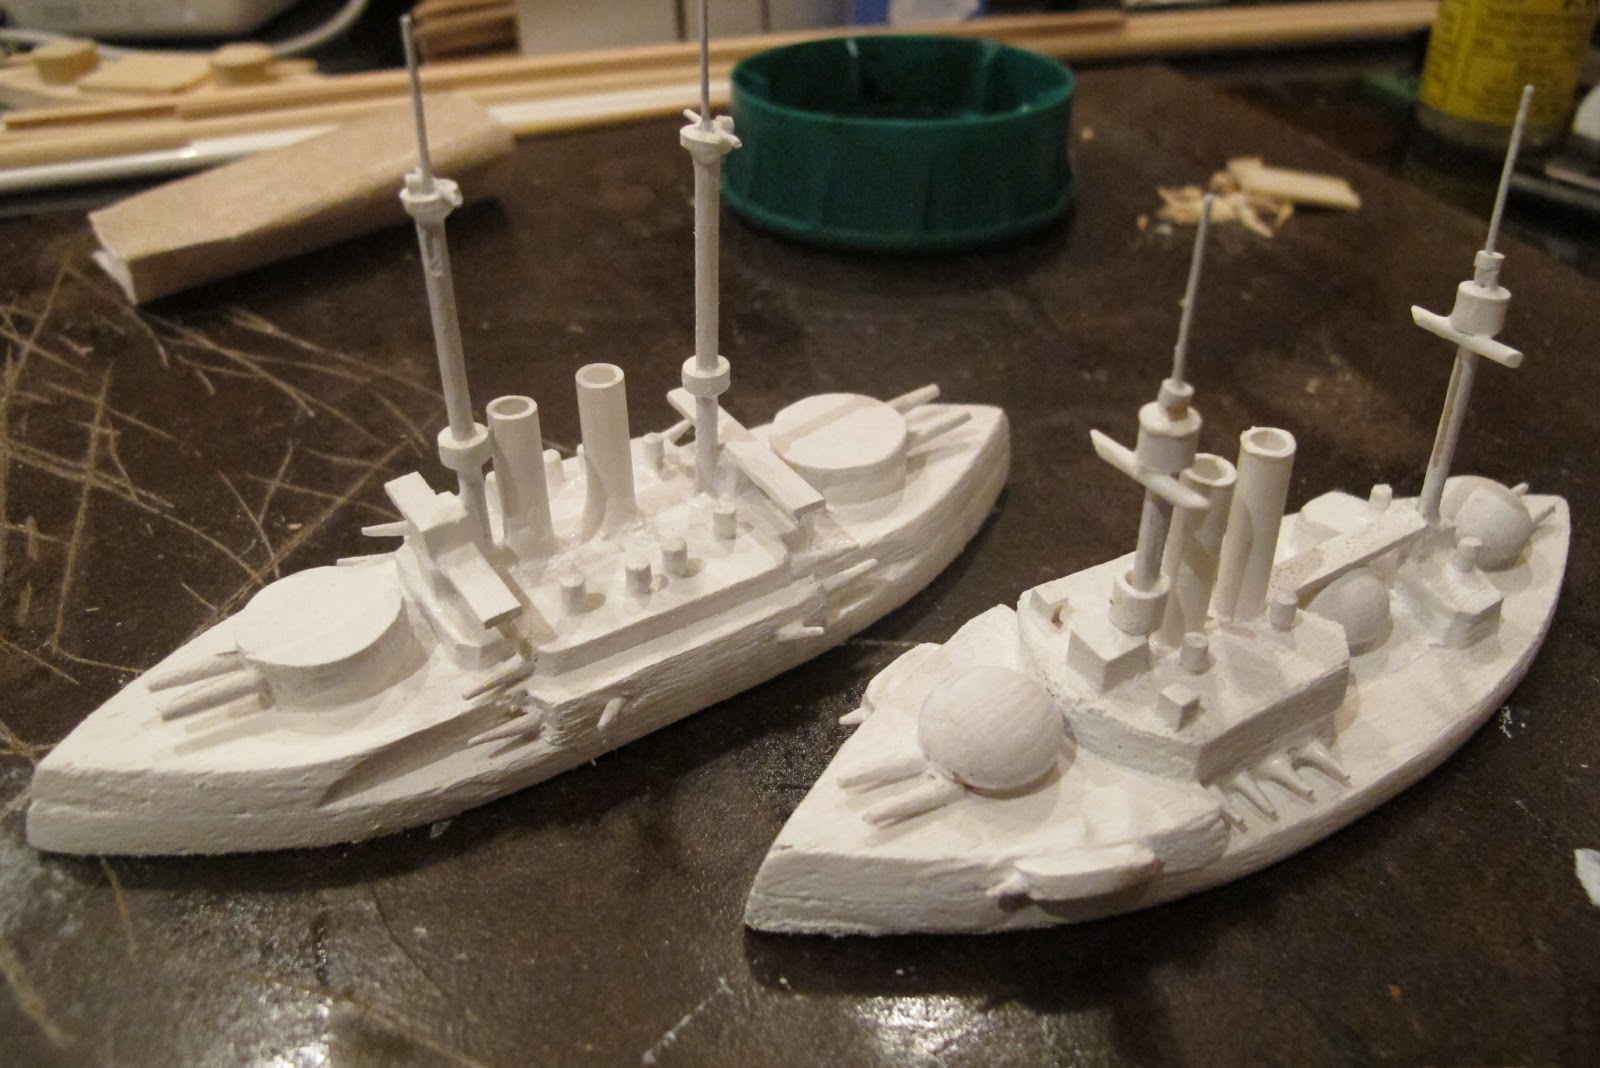
 The result is pretty satisfying, even if they are not true scale models, they are fairly faithful to the general look of the historical ship (which is what my earlier efforts had missing). They have a nice heft and plenty of room for deck details.
HMS London in it's raw state...still working on the masts.
 I used balsa for the main hull and wood toothpicks for the gun barrels. Some plastic tube and metal pins make up the rest...all really cheap available materials.
SMS Brandenburg..the models are very raw at this point...sanding and priming will hopefully take care of the imperfections.

First coat of acrylic gesso to seal and give a good primer coat to cover imperfections in the balsa hull

the London and the Brandenburg...a first pass at a new fleet of pre-dreadnoughts


Finally a few pics from the internet to make the visual comparisons easier...
SMS Brandenburg during the late 1800s...she was refitted in WWI so some of the barbettes were no longer visible in later pics. She was part of the German fleet during the Boxer Rebellion

The "business end" of the Brandenburg
 
I'm finding the wealth of info on the web to be a scratchbuilders dream...that spherical turret on the Brandenburg is way-cool and not just a little "steampunk" as well!

Friday, November 30, 2012

Finally Got Up the Steam

 One of those long untended areas here at the Lead Gardens is my project to paint up the plastic figures of my Battle Cry game. But I recently got re-energized by an ebay purchase of a second copy of the original Hasbro/AH game and doubled my figure count and opened up the possibility of doing more ambitious battles like Gettysburg in a more "grand manner".
 I finished the first set of Rebs last night and was pretty happy with the result. Though they are still a bit too shiny in these pics...I think another coat of flat spray will do the trick.

 I also think I managed to find the ideal solution to the plastic figure painting problem. I did the usual soap wash and then followed with an undercoat of black acrylic gesso mixed with "Weldbond" PVA glue. Weldbond is very tough and flexible and dries very tight to the surface and I think enhances the already great adhesion of just straight acrylic.
 I followed with a classic triad of base block colors, plus ink wash (I use "Didi's Magic Ink" from "The Warstore"), followed by a light drybrush of white. I coated the figures with Krylon triple thick gloss which gives the figures a very durable top coat. I then made a pass with Krylon Matte spray to get the shine to "flatten", but with only some success in getting to a satin finish. I'm going to try again tomorrow but I think the figures are at least a bit better than unpainted.

 You can see in the pics that I have to go over the bases again because pulling them off the paint sticks peeled the paint around the edges of the bases but that should be easy to fix.

 I think in general these guys came out too dark so in the next set I'm going to try to lighten the colors so when the wash is applied it should not darken things too much.
 I also replaced the game flags with paper flags downloaded from the various free flag sites.


Ultimately I want to be able to throw these fellows back in the box and not loose any paint to chipping...so we will see...
...But, I may eventually base these guys up and go to marking hits on a stand instead of the individual figures.
Sunday, November 25, 2012

Exciting Holiday Find

 I don't normally love the holiday season because here in the states it can get a bit crazy. But one thing I always look forward to is the holiday decorations that can be turned to good use for wargaming. Today I found a Christmas tree rug 30" in diameter with a nice green grass surface on one side and a smooth black rubber surface on the back. it was under 10 dollars and I bought one and headed home with my gaming wheels turning!

I got home and gave the rubber backside a coat of blue acrylic loosely applied letting some of the black show through...making a nice ocean texture. Then I got out a hex "template" that I had saved after punching out a Battle Cry boardgame a few years ago...(my wife calls me a hoarder but it's for just such a moment that I save things.

I got a hole punch and punched the vertices of the leftover hex sheet giving a good sized template to use for laying out some ocean "terrain" for my predreadnoughts. I just used a white gel pen to mark dots at the vertices and then freehanded the sides of the hexes...(a little drawing ability helps here...) The result is loose but effective. And the board is 12+ hexes across ...and at the game scale I think works with my ships, (1 hex to 1000 yards)which would be extreme engagement distance for ships of that era. Ships are allowed to use movement points to turn more than one hexface since the scale of the hex allows even the largest ship to turn within the hex. This is a variation of Bob Cordery's Naval version of his Memoir 44 based rules.
 I enjoy the way the circular board gives a sense of there being a horizon. It also reminds me of the "battle board" in the old Avalon Hill Bismark game...which I think I still have somewhere in my garage.


Now what to do with the grassy side....

PS, I found this mat at Lowes.

Friday, November 23, 2012

My Son's New Blog

My son started a new blog called Ben's Botcreations he's really enjoying taking things apart and reassembling them. I promised him I would give him a little "press" here on Lead Gardens so if any of my followers have youngsters he'd love it if they check in on his blog.
I think he is a scratchbuilder in the making...Thanks everyone!

Tuesday, November 20, 2012

Home Brewed Pre-Dreadnoughts

Pre-dreadnoughts painted British style.
 I've been following a few blogs where homemade wargaming minis feature particularly "Wooden Warriors", and I was also looking at the yahoo group, "wargaming on a budget" this morning and it reminded me of a little project I started a year ago that was my shot a wargaming on the cheap.
 These pre-dreadnoughts are made of precut wooden shapes that can be had by the bag at typical craft outlets here in the states such as Michael's or AC Moore. I make the turrets from discs cut out of craft foam sheet using a paper hole punch. guns are from the ends of round toothpicks or in some case the ends of decorative toothpicks. The hole punch also works for punching thin sheet styrene. Sections of toothpick, styrene tube rod, and a wee bit of brass wire and you're all set.

The hulls are built-up using a stack of two or three of the same size shape with each layer shifted just a bit to give the impression of a pre-dreadnought bow of the period.
The German-ish fleet
The ships are stylized and a bit cartoonish, but the overall effect is belligerent in a 19th century "big stick" sort of way and to my eye pretty convincing. I've been trying to work up some rules that would not involve record keeping (...to me the toxic part of naval gaming...as well as spaceship gaming for that matter...) Just a few hit markers or such. Perhaps a system a bit like the old SPI Dreadnought game. I was also thinking these might work on a gridded field using a more abstract movement system of some sort.

I just used British and German color schemes from the late 19th century to give everything the right feel visually.
One thing that makes this project go quickly is having a "Chopper" from Northwest Short Line. It's perfect when you need a bunch of wood cut to the same length (perfect for those toothpick gun barrels).
The "Chopper"

Sunday, November 18, 2012

The Full Monty, (or Cunningham)

Late in the game, the 15th Panzer in control of the field with swarms of Commonwealth infantry scrambling to hold the line after the heavy British tank losses. German infantry still cling to the airfield at Sidi Rezeg on the left of the pic. Italians still hold Bir El Gubi at the bottom right, and the South African Brigade is left facing German armor in the center.
I got a copy of the Memoir 44 "Breakthrough" boards in last Friday's post and I had some time today to set up the "Crusader" scenario. I had also recently purchased the new "equipment pack" with lots of special figures to add some spice to the M44 stew. In this big game I am going all-out with all optional rules and added a few extra units to the original scenario as well as some adjustments to the map to make it look "more like the actual battle" to my eyes.

Playing a desert scenario of a battle this large demand the inclusion of such goodies and rules like scout cars, supply trucks, 88s, big guns, mobile artillery, command cars (to represent Rommel) and the air pack. I also used the Churchill tanks included in the equipment pack to represent Matildas and treated them using the "Tiger Tank" rules (since they were really hard to kill given the light guns of the time) and reduced their move to 2 hexes since they were slow infantry tanks. And finally the grey French figures in the new equipment pack served nicely as Italian infantry and the Japanese tank minis from the Pacific served here as Italian armor.

The Lufwaffe really took a toll in this first game since with his free order Rommel was able to keep the air assets up and flying for several turns in the center sector where all the British armor was concentrated. The supply truck rules allowed units to withdraw to resupply and recover a hit. This made the game ebb and flow just like the real battle. With 12 medals required for victory the the game was long enough to support a withdrawal and return to the fray. For such an abstract game this was really not a bad representation of the battle.


Friday, November 16, 2012

Spencer Smiths for Sale

 I selling a venerable unit of 30mm Spencer Smiths on ebay since my collection is upscaling to 40mm. Find the link here: http://cgi.ebay.com/ws/eBayISAPI.dll?ViewItem&item=160923658629