Showing posts with label Workbench. Show all posts

Monday, May 12, 2014

Casting Season

 It's casting season here at the Lead Gardens. The weather has "springed up" and it's perfect for getting
outside and starting on some summer casting projects. Outdoor casting has the advantage of keeping the  nasty metal fumes out of the house.

I purchased three of the new 40mm Prussian molds from Prince August. I found the new moulds to be a nice change from the sometimes awkward poses of PA figures. The apparently have listened to those of us who war-game with these big guys and need a versatile figure that will paint up to most 18th century types.

Here are the wargame friendly features of the new molds:

1. The mould will cast two figures at a time, effectively halving casting time---particularly if you go for big units (mine are established at 40 figures) I got this new unit done in about 5 hours in two sessions over a weekend.

2. The moulds have two separate heads-- the basic infantry mould has both a musketeer in tricorn heads and grenadier heads in mitre two each so casting the mould will supply the optional heads as well.  The officer, standard bearer, NCO, drummer molds have tricorn and fusilier heads. I bought all three moulds so I've got lots of spare heads now (to do a fusilier unit will take a lot of officer casting because the fusilier head only comes in the drummer mold)

3. The detail is more accurate for the Prussians.

4. The pose matches the older infantry advancing pose, though I hear they will be coming out with a march attack pose later.

5. The heads cast separately but are very easy to attach thanks to a nice sturdy peg cast on the head in conjunction with a plastic rod that is inserted into the mould before casting. This ensures that the hole for the peg in the body of the figure is perfectly sized.

 I went with a unit of grenadiers that will represent one of the units from my Imagi-nations. I have been upscaling all of those figures from my original collection of 30mm RSMs.


The only downside of the casting session was having to do a bit of vent cutting to get the heads to cast properly. That is typical of PA moulds so not a big deal really. The only thing I had real trouble with was getting the officer's sword and had to cast (it's a separate piece)…but I think it's because I use old figures for my metal and I'm guessing if I used some of PA's higher quality casting metal, it would make things easier.

I'll be posting progress on the painting of this unit soon.

Cheers!

Tuesday, December 18, 2012

An Odd Idea


 I was reading the classic "Little Wars" a few nights ago (something I do from time to time to get re-inspired), and an idea was rekindled in my head regarding how to make woods on the gaming surface. H.G. Wells had a set of large rectangles of wood planks that, when stacked, served as hills. Though it's not mentioned in the text (but outlined in some detail in his "Floor Games"), his approach to making woods involved having the hill boards drilled in a grid to take short branch cuttings from actual trees to make his wooded areas. You can just make out the grid of holes in the pictures in "Little Wars". I've always wanted to give that idea a try but never had the wherewithal to tackle it given that it seemed like a bit more than was necessary to produce woods. But the idea still hung around my thinking and finally ran into an opportunity to give it a try...now this is an odd idea for sure as it involves "damaging" a game I own...but I still thought it had good possibilities so I decided to give it a try.
A Reb unit assaults a wood defended by Union infantry and a battery of artillery. (The game board is a bit shiny and I was thinking a quick coat of matte spray might make the whole look of the game a bit more like a tabletop wargame rather than a boardgame.
Basically I took the idea of drilling the game surface to accept trees to one of my "Battle Cry" game boards to try a way of producing wooded hexes without having to use the flat tiles included in the game.

The result is kind of cool, but perhaps a bit "out there" if one wants ever to resell the game. And maybe just a bit too "fiddly"....I just drilled each hex vertices using a small bit (1/16") and sized to take the trunks of some nice little wire trees I got on sale at my local hobby shop. I forget the manufacturer of the trees but they are simple twisted wire trees with some clump foliage glued on. But when you stick them into the board surface it gives a fairly good alternative to the woods tiles. (I think this idea would work even better if you laid the gameboard on a piece of blue styrofoam insulation so the trees would hold better in the surface.

I'm still not completely sold on this idea. I just drilled a corner of one of the two Battle Cry boards I own just to experiment with it. I have to give it a few days to see if I really want to drill all of my boards this way. it just seemed to me that if I was painting the figures I should do a little more with the terrain. It kind of warps the boardgame idea...but the effect is pretty good.

I also want to do the full treatment of this idea for my 40mm homecast horse and musket stuff by doing up some layers of boards drilled to H.G. Wells specs. (...and not to mention the new Spencer Smith 42mm 'Little Britons" has got me on full alert... with calculator in hand trying to work out how to afford a classic set of "Little Wars" toys soldiers! (Many thanks to Ross for the link!)

Nothing like some experiments to get the gaming juices flowing!


Sunday, December 9, 2012

Inspired

 This week has been very productive here at the Lead gardens both because I am approaching the end of the teaching term and have a bit more time and because of the trip my wife and oldest son took to New York this past few days has given me the run of the house with my youngest daughter who is pretty easy to take care of. I managed to get some pre-dreadnoughts built and painted and had a few fun games to get me into the "holiday mood".  This afternoon I made good progress on painting up the Union figures for my Battle Cry game. Late today I was ruminating on the "Memoir of War at Sea" rules and had an, "oh wait, I have something that will work for this!" moment. So I went out to the garage (where my "gaming stuff" is stored) and I unearthed a box of 1/600 sailing ships that I had built more than 20 years ago when I was first living on my own after my first marriage went kaput. In those few months I spent in a sparse apartment without much in the way of furniture, and lots of time on my hands, I bought a bunch of Airfix 1/600 "Victory" and Heller 1/500 "Le Superb" plastic kits and set to building converting and scratchbuilding a small French and British fleet of sailing ships.
The original 1/600 Airfix kit
 I really got into it and the results were very satisfying even if I had no really good rules to use for solo gaming in the period.
This is the Heller 1/500 Le Superb unfortunately I think out of production, and I've got only four unbuilt kits left. The Victory is still available.
 I learned a lot about scratchbuilding back then and I still have a few kits left unbuilt. The scale is great for small actions.
 So I'm thinking a variant of the variant "Memoir of Battle at Sea: Age of Sail" is in order...and this afternoon I sat down with pencil and paper to do just that. As soon as I get a draft up I will post it and see what my readers think.
Some of the smaller ships were entirely scratchbuilt...and unfortunately are in need of some repair


 The scale of 1/600 is really beautiful for sailing ships and a good size if you want to do some basic rigging. The scale works also because ratlines can be simulated with a triangle of window screen cut to the proper size.
A big French three decker...the 120 gun "Orient"
 I tried to model each of these after a real ship and for this rule variant I thought a nice goal would be to make a simple game that still was able to account for different ship armaments. I've got some simple formulas cooked up based on the broadside weight to rate the ships for number of battle dice to roll and and the tonnage to give a damage value. Next I'm cooking up some sailing rules that will hopefully keep everything really simple  and in the spirit of Bob's variant on the M44 rules approach.
Some of the smaller ships are pretty damaged but I think in time I can bring them back to full glory! This is the British 44 gun frigate "Sprite"

The whole collection.
I'm pretty excited about this new direction, but of course, as always, the specter of being spread over too many projects looms on the horizon...but what the hell, I never let that stop me before!

Tuesday, December 4, 2012

Getting the Steam Up: Part 2 Predreadnoughts

Rescaled plan of the HMS London...the original scan from Janes Fighting Ships 1905-6 is on the upper left, the rescaled version is on the right.
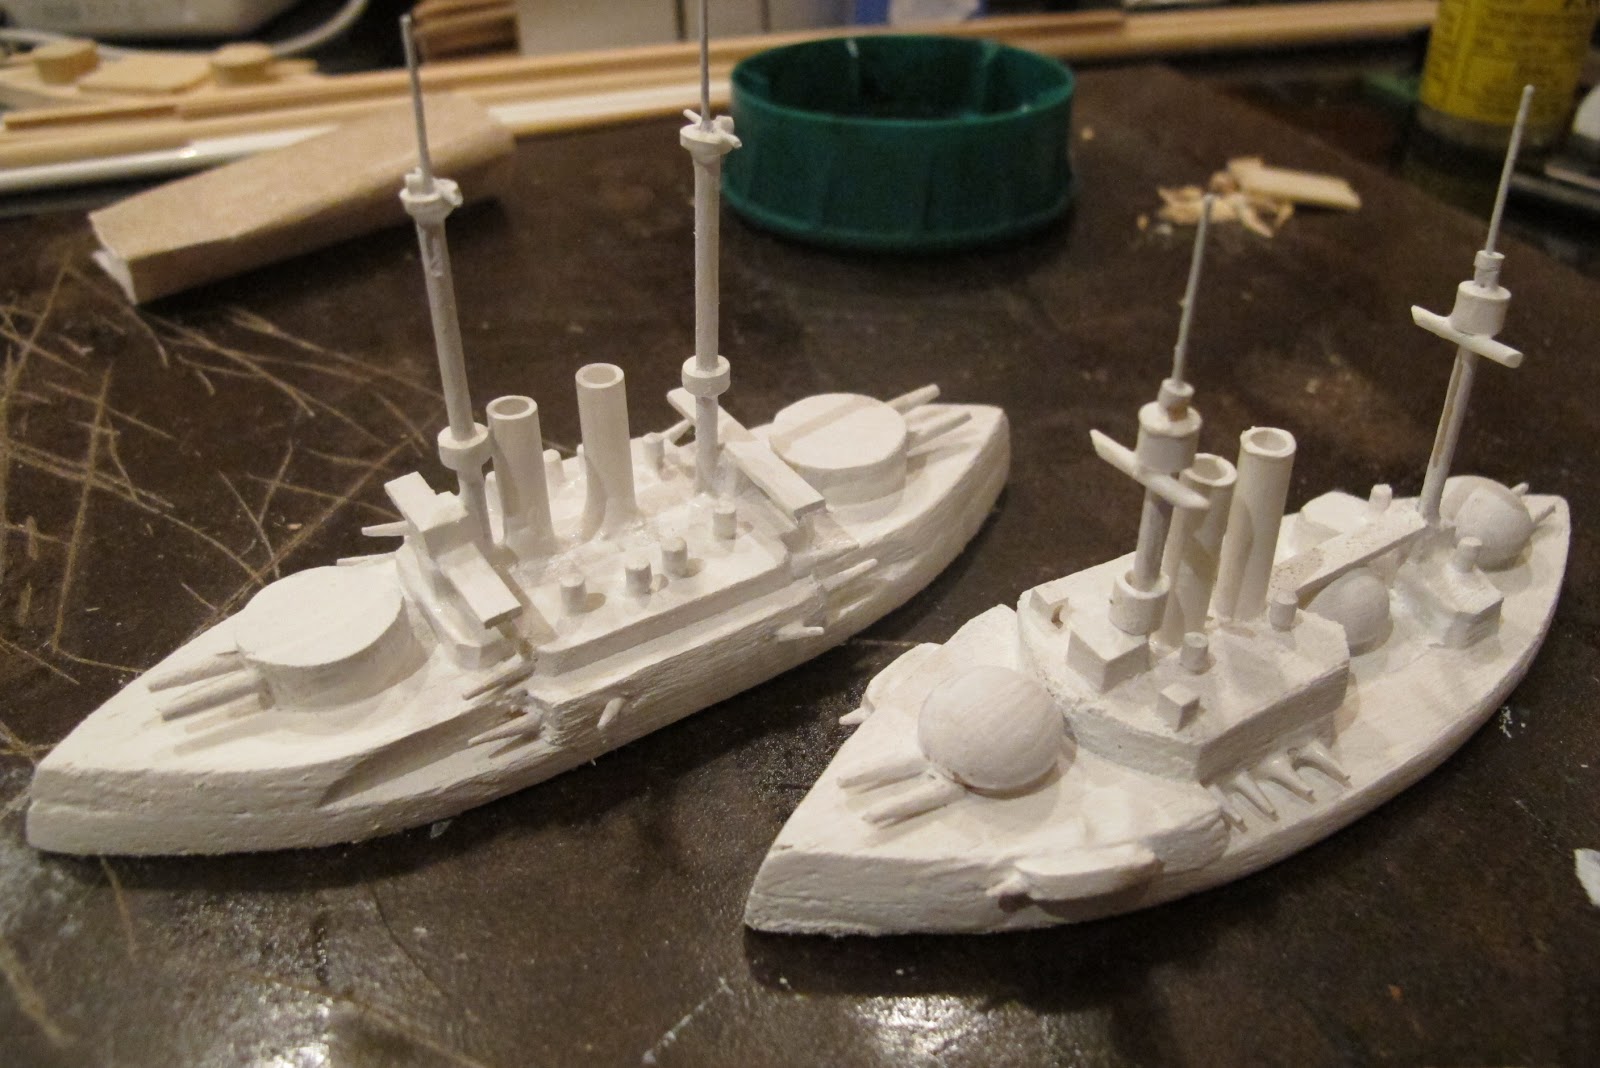
 Much-inspired by some great links sent to me after my recent post on some homemade pre-dreadnoughts I have moved into a "Homemade pre-dreadnoughts Mark II" phase. In particular, I am enjoying the look of the really cool pre-dreadnoughts on the "Old Admirals" blog, and Bob Cordery's stylized wooden predreadnoughts. I decided my small scale pre-dreads were a bit too small and I was taken with the idea that the ships could be larger and carry a bit more detail while remaining entirely scratchbuilt from inexpensive materials and, most importantly, quickly built.
SMS Brandenburg
 My approach was to take original scans from a copy of Janes Fighting Ships 1905-6 that I recently got on ebay (for a really great price) and manipulate the scanned image to give me a new template on which to base the hull shape. I wanted a more abstract look to the models, and just a bit stylized so I settled on a 1.5 inch width by about a 5 inch length to make my battleships. This size would work with 4" or 5" hexes and give me the look and the size that would allow some more complex detailing on the models. Most importantly I could use round toothpicks and readily available wood shapes for turrets and gun barrels and everything would still look believable to the eye. So the scanned image was resized in Adobe "InDesign" to get the shape that I was looking for...so shorter length and wider beam was the watchword.
HMS London
 The result is pretty satisfying, even if they are not true scale models, they are fairly faithful to the general look of the historical ship (which is what my earlier efforts had missing). They have a nice heft and plenty of room for deck details.
HMS London in it's raw state...still working on the masts.
 I used balsa for the main hull and wood toothpicks for the gun barrels. Some plastic tube and metal pins make up the rest...all really cheap available materials.
SMS Brandenburg..the models are very raw at this point...sanding and priming will hopefully take care of the imperfections.

First coat of acrylic gesso to seal and give a good primer coat to cover imperfections in the balsa hull

the London and the Brandenburg...a first pass at a new fleet of pre-dreadnoughts


Finally a few pics from the internet to make the visual comparisons easier...
SMS Brandenburg during the late 1800s...she was refitted in WWI so some of the barbettes were no longer visible in later pics. She was part of the German fleet during the Boxer Rebellion

The "business end" of the Brandenburg
 
I'm finding the wealth of info on the web to be a scratchbuilders dream...that spherical turret on the Brandenburg is way-cool and not just a little "steampunk" as well!

Friday, November 30, 2012

Finally Got Up the Steam

 One of those long untended areas here at the Lead Gardens is my project to paint up the plastic figures of my Battle Cry game. But I recently got re-energized by an ebay purchase of a second copy of the original Hasbro/AH game and doubled my figure count and opened up the possibility of doing more ambitious battles like Gettysburg in a more "grand manner".
 I finished the first set of Rebs last night and was pretty happy with the result. Though they are still a bit too shiny in these pics...I think another coat of flat spray will do the trick.

 I also think I managed to find the ideal solution to the plastic figure painting problem. I did the usual soap wash and then followed with an undercoat of black acrylic gesso mixed with "Weldbond" PVA glue. Weldbond is very tough and flexible and dries very tight to the surface and I think enhances the already great adhesion of just straight acrylic.
 I followed with a classic triad of base block colors, plus ink wash (I use "Didi's Magic Ink" from "The Warstore"), followed by a light drybrush of white. I coated the figures with Krylon triple thick gloss which gives the figures a very durable top coat. I then made a pass with Krylon Matte spray to get the shine to "flatten", but with only some success in getting to a satin finish. I'm going to try again tomorrow but I think the figures are at least a bit better than unpainted.

 You can see in the pics that I have to go over the bases again because pulling them off the paint sticks peeled the paint around the edges of the bases but that should be easy to fix.

 I think in general these guys came out too dark so in the next set I'm going to try to lighten the colors so when the wash is applied it should not darken things too much.
 I also replaced the game flags with paper flags downloaded from the various free flag sites.


Ultimately I want to be able to throw these fellows back in the box and not loose any paint to chipping...so we will see...
...But, I may eventually base these guys up and go to marking hits on a stand instead of the individual figures.

Sunday, November 25, 2012

Exciting Holiday Find

 I don't normally love the holiday season because here in the states it can get a bit crazy. But one thing I always look forward to is the holiday decorations that can be turned to good use for wargaming. Today I found a Christmas tree rug 30" in diameter with a nice green grass surface on one side and a smooth black rubber surface on the back. it was under 10 dollars and I bought one and headed home with my gaming wheels turning!

I got home and gave the rubber backside a coat of blue acrylic loosely applied letting some of the black show through...making a nice ocean texture. Then I got out a hex "template" that I had saved after punching out a Battle Cry boardgame a few years ago...(my wife calls me a hoarder but it's for just such a moment that I save things.

I got a hole punch and punched the vertices of the leftover hex sheet giving a good sized template to use for laying out some ocean "terrain" for my predreadnoughts. I just used a white gel pen to mark dots at the vertices and then freehanded the sides of the hexes...(a little drawing ability helps here...) The result is loose but effective. And the board is 12+ hexes across ...and at the game scale I think works with my ships, (1 hex to 1000 yards)which would be extreme engagement distance for ships of that era. Ships are allowed to use movement points to turn more than one hexface since the scale of the hex allows even the largest ship to turn within the hex. This is a variation of Bob Cordery's Naval version of his Memoir 44 based rules.
 I enjoy the way the circular board gives a sense of there being a horizon. It also reminds me of the "battle board" in the old Avalon Hill Bismark game...which I think I still have somewhere in my garage.


Now what to do with the grassy side....

PS, I found this mat at Lowes.

Tuesday, November 20, 2012

Home Brewed Pre-Dreadnoughts

Pre-dreadnoughts painted British style.
 I've been following a few blogs where homemade wargaming minis feature particularly "Wooden Warriors", and I was also looking at the yahoo group, "wargaming on a budget" this morning and it reminded me of a little project I started a year ago that was my shot a wargaming on the cheap.
 These pre-dreadnoughts are made of precut wooden shapes that can be had by the bag at typical craft outlets here in the states such as Michael's or AC Moore. I make the turrets from discs cut out of craft foam sheet using a paper hole punch. guns are from the ends of round toothpicks or in some case the ends of decorative toothpicks. The hole punch also works for punching thin sheet styrene. Sections of toothpick, styrene tube rod, and a wee bit of brass wire and you're all set.

The hulls are built-up using a stack of two or three of the same size shape with each layer shifted just a bit to give the impression of a pre-dreadnought bow of the period.
The German-ish fleet
The ships are stylized and a bit cartoonish, but the overall effect is belligerent in a 19th century "big stick" sort of way and to my eye pretty convincing. I've been trying to work up some rules that would not involve record keeping (...to me the toxic part of naval gaming...as well as spaceship gaming for that matter...) Just a few hit markers or such. Perhaps a system a bit like the old SPI Dreadnought game. I was also thinking these might work on a gridded field using a more abstract movement system of some sort.

I just used British and German color schemes from the late 19th century to give everything the right feel visually.
One thing that makes this project go quickly is having a "Chopper" from Northwest Short Line. It's perfect when you need a bunch of wood cut to the same length (perfect for those toothpick gun barrels).
The "Chopper"