Showing posts with label Buildings. Show all posts

Sunday, November 11, 2012

Northwest Frontier: "Big Battle" Style

 Re-set my gridded table to 1878 for a little Northwest Frontier action Portable Wargame style, this time using Bob Cordery's "Big Battle"  19th century revisions to the rules. In recent months I've managed to add a few units to both sides of my NW Frontier collection so this battle proved to be pretty big.
The happiest Pathan commander I ever encountered...(actually she just was there for the photo op...Hot Wheels cars are more her taste these days)...

The Headman of the Waziri's village.
 I also used some simple cardboard buildings I built a while back using boxes from the local "Michaels" craft store...You can see a tutorial for making them here.

British begin to deploy for battle

Highlanders and Punjabis advancing on a Pathan held ridge

"Piper, sound the charge!"
I'm also using my added "heroic action" rule in this game where an attached individual leader figure (except the CinC)  can force a re-roll of any close action dice and taking the second outcome...while risking a D6 4-6 roll to eliminate the leader for exposing himself heroically in the action...The British typically have one or two leader figures for each 3 stand "Battalion", and the Pathans have one leader for every 5 units.
The CinC of the British force and an artillery leader figure.

Pathan cavalry make an early charge on an advanced guard of the 12th Bengal Horse.


 The figures are a mix of Jacklex 20mm and Ral Partha 25mm...and after some initial trepidation at the slight scale difference, I've grown accustomed to it and the units all seem "in scale" to me now. Especially since I mixed figure scales in the Pathan irregular bases. It surprisingly looks just fine.
 The Jacklex cavalry actually works better for this basing style (40mm squares) since I can fit 3 cavalry to that size base.
Highlanders and Punjabis scale the ridgeline

a mountain gun in support

Bengal cavalry and Ghurkas in a wild melee on the plain with Pathan cavalry.
Finally, I did find the Portable Wargame Big Board rules to be "cleaner" than the earlier versions. I particularly liked the simplified activation die rules. I did find myself "tinkering" with the Close Combat rules. They seemed to be a bit indecisive in that units could "lock" into close combat and not be able to get an outcome for several turns (particularly cavalry since it only takes a hit on a "1" in close combat so two cavalry units would stay locked in close combat for several turns without a result). So I tried the following rule change:

Units hit in close combat only translate "hits" as follows:

Elite Units        1or2= unit destroyed       3,4,5,6=mandatory one square retreat and lose 1SP
Average Units  1,2,3= unit destroyed      4,5,6=mandatory one square retreat and lose 1SP
Poor units        1,2,3,4=unit destroyed      5,6=mandatory one square retreat and lose 1SP

This rule adjustment served to both speed up the game just a bit and to make Close Combat more decisive...sort of a balance I think between Bob's intent and Morschauer's more "bloody" basic combat resolution approach where hits always eliminate. It also serves to differentiate fire combat results from Close Combat and at least it gave the Highlanders a reason to charge that heavily defended ridgeline!

But regardless, it produced a fun Sunday's diversion, and some thoughts about a possible campaign using a "squared" larger map that is scaled to my tactical table size of 18x18 grid squares so each grid square on the map would be a "table".  The battle rules are clean and fast so running a campaign could actually work, and I can spice it with some skirmishes using "Sword and the Flame" if needed.


Sunday, July 22, 2012

15mm Spanish Village: Finishing Up


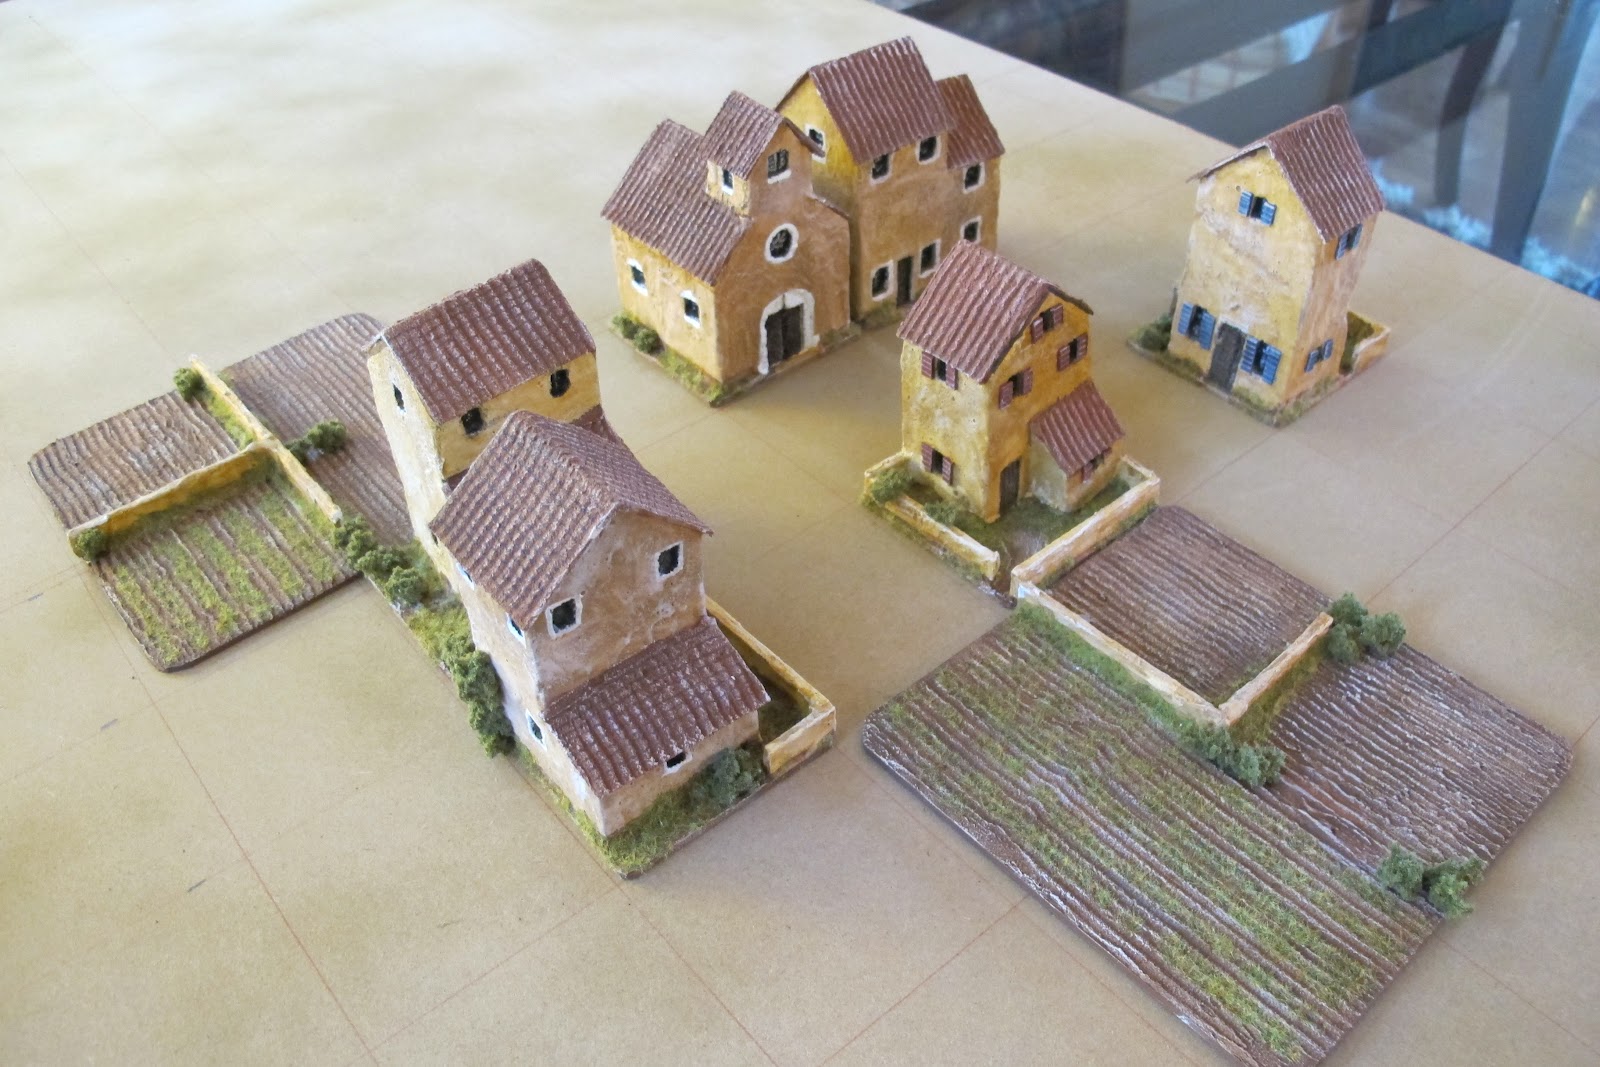
 I was able to make a few final touches on the Spanish Village with the addition of bases that would cover a 2 1/2" grid square and give a little area for added scenics. Though I think I will have to use some method for indicating units occupying the buildings as there is no room for them in the square if a building is in place.
 I also had a try at making some plowed fields after being inspired by Jeff's suggestion using the Liquitex "Ceramic Stucco". All the bases and the fields were made of the backing cardboard from a pad of drawing paper cut to size. The walls on the fields and building bases were cardboard as well and served to stiffen the cardboard when later painted. I found the fields warped for a while when the Liquitex was drying but they dried flat eventually. Just a matter of painting and some added foliage and a small amount of static grass and time to call the project finished.
Here you can see the fit of the buildings on the gridded surface


 I also did a final pass with a sharp pencil across the lines of the roof tiles to get a more convincing rendition of a pan-tile roof.
The final effect looks ok to me, and the added bases also give another layer of protection to the inner core of relatively soft foam inside. The buildings seem pretty sturdy and should survive a few knocks.
All ready for battle!
So now the wait for the SCW figures from Peter Pig will hopefully not be too long.
(This just in,.... a note from Peter Pig just arrived in my in-box saying the SCW figures are now headed my way...!)

Wednesday, July 18, 2012

Spanish Village in 15mm: On the Cheap!

basic buildings from floral foam topped with cereal box cardboard...a simple start, but lots of potential
 "Mind the Pennies" is the watchword here at the Lead Gardens these days and my latest emerging project is no exception. After having some nice success re-basing my colonial 20mm stuff and having a few recent battles using the "Portable Wargame" rules ...(thanks for all the encouragement guys!)... I came into a bit of "extra" funds to start another small project. I've been contemplating getting back into Spanish Civil War after a long (15 years) hiatus and the "Portable Wargame Rules have got me thinking that I could do two armies in 15mm relatively cheaply using the "Peter Pig" line of SCW minis and the look and scale of the rules would lend themselves to a good looking as well as an inexpensive game.  So I fired off an order to the folks at Peter Pig this weekend and while I wait I'm going to work on terrain for Spain circa 1930s in keeping with the Portable Wargame table that I gridded off for my NW Frontier colonials. That means everything has to keep to a 2 1/2" grid square, and be fairly simple and inexpensive to produce. Though I do love the Hovels line that I used when I was doing SCW in 20mm (using the great Historical Products SCW line sculpted by David Allsop and still available from Pat Condray) way back when, and some of the JR miniatures buildings in 15mm are workable as well, I'm trying to reduce the cost of terrain to a bare minimum. Rather than go with my usual old school building approach, (of buildings made of basswood or balsa, painted and the details drawn on), I thought that the SCW 15s might be better with a bit more detail in keeping with the figures and vehicles.
a coat of water putty for the walls and a layer of Liquitex ceramic acrylic for the roofs
 One of the things I have found in dealing with buildings on the game table over the years is that keeping the "footprint" of the buildings small is always good so as to not give away too much maneuvering space on what are usually for me limited sized tables. So my approach is to make the buildings a bit tall in relation to their width and depth. This does two things— it preserves the scale height so the figures and vehicles don't look too giant next to the buildings, and preserves the all important table real estate for deploying units.
a really quick and dirty Spanish village takes shape
 My "Portable Wargame" table is gridded into 2 1/2" squares so the buildings are going to have to fit within that dimension. This past Monday I was able to duck into my local craft outlet and I found some florist foam that was of a slightly higher density than what normally is used for flower arranging (usually the flower foam is way to soft for gaming purposes...)  so I took a chance and bought three small blocks of the stuff thinking an experiment was in order.
the village church
 I was pleasantly surprised to find that the stuff was pretty sturdy yet cut really easily and I could make a balsa tool to press windows and doors into the foam building shape. The next step was to make the surfaces more durable and get a credible "pan tile roof" that would pass for Spanish buildings. I looked at many possible roof ideas including plastic molded sheet (not available in town)...stiffened corduroy fabric...maybe, but I didn't want to have to drive out to a fabric shop. While looking around our local art supply shop before heading in to work today, I found some "Liquitex Ceramic Stucco" acrylic paint which fit the bill perfectly. So that combined with some DAP water putty for coating the building faces, I was all set to make a quick, cheap and most importantly,  a convincing Spanish village of the 1930s.
Liquitex textured acrylic solves the roof problem ($10.00 USD for the jar and the project only used a few tablespoons of the stuff)
 The DAP water putty adheres to the foam really well and stiffens the soft surface of the foam. I used thin cardboard from a cereal box to make the basic planes of the roof and used super glue to stick them to the basic building shapes. The "pan tiles" were created by spreading a thin layer of the Liquitex Ceramic Stucco acrylic and then using a "v notched" spreader to make the lines of the roof tiles. Once it had all dried the foam was both protected and stiffened to a reasonable sturdy finish (as long as nobody steps on them....)
The combination of textured acrylic and "V notched spreader" is the secret to making pretty convincing roof tiles
 Then came a stain of yellow ochre colored paint and red brown for the roof tiles and followed by some drybrushing....and in a day and a half I had a small village completed! (I did do a small bit of detailing on a few of the buildings using some textured plastic sheet for shutters...but the buildings look good even without that extra bit of work)
 This weekend I'm planning to base these buildings on 2 1/2" square bases to help protect the undersides of the foam from damage, so hopefully the building will stand up to some use.

So I'm now thinking to make some vineyards and plowed fields with the remaining texture paint...and hopefully the figures will arrive in due time and I can get to painting up a new period. I hope to get this new project done before the fall semester begins and my teaching load ramps up again.

So I managed to get 6, 15mm buildings for less than $10.00 USD with just a couple of short working sessions over the past 2 days...I like those numbers!

Friday, July 8, 2011

...and the Up Side.

After a discouraging few days lamenting the demise of my paper buildings...I buckled down and repaired and rebuilt them all and on top of that, built a nice church (also available free at GHQ) that takes only about an hour to construct. I was able to get all the wrecked buildings back into shape and despite a few bent spots they don't look too bad. One of them had a hole torn in the roof which I just left and painted some fire damage and it looks pretty convincing. Adding some bits of clump foliage around the bases also makes a huge difference (especially with paper houses since it encourages your eye to perceive the flat surfaces as more three dimensional and less "papery")

So now I have experienced the full ups and downs of paper terrain...and hopefully I can keep that little monster away from my stuff till she gets a bit older!

Tuesday, February 1, 2011

Building a Windmill in Classic Style

Now that the Lead Gardens building program is in full swing, I thought I would tackle a long anticipated project to build a windmill to give the table a bit more "old world" period flavor. I want the windmill to serve both my 18th century battles as well as my English Civil War games in 40mm so I first dug up some references I had stashed away a year ago...thank goodness for the search feature on my computer!
 The Windmill will be one that is mounted on a heavy frame and presumably was intended to rotate to face the wind.


 I decided to go with basswood for this one, and began with a precut base I had on hand that became the base for a simple frame made of basswood. The base is 60mm square and the height of the frame is about 1" high. The references show a pretty tall structure and I want something that will give a decent sized diameter to the blades of the windmill so the dimensions felt right.

 The base frame goes together quickly with just a bit of trimming of the members...

 Then the sides are cut from a sheet of basswood, and, as in the last tutorial, cutting the gable ends using a simple "x" cut and saving the leftover triangles for later.

 the sides are glued up and set on a square of balsa that has a square hole in it cut at the size of the center post
 ...then all of that assembly is glued to the center post...
 ...So the basic windmill is formed.

 I add the leftover triangle pieces from the earlier side cutting step to "beef up" the gable ends

 a block of basswood is added to the structure to make a spot to attach the blades of the windmill..


 next step is to tackle the windmill blades...a tough problem...especially if we are trying to keep it in a simple old school style...

 ...first I made a cross of two small sections of basswood...each notched to make a cross shaped piece to work as a connector for the blades...which I have yet to figure out how to make...

ideally the blades of the windmill should be very simple to make in keeping with the "Old School" flavor of the project.

So now the big problem...how to construct the blades???

...I'll have to sleep on that problem...any ideas are most welcome!

Sunday, January 30, 2011

Classic Wargames Building Tutorial

One of the many delights that comes from "Classic Wargaming" (or "old school" if you will...) is the feeling that there's nothing that cannot be produced easily and inexpensively for the sake of a good game. The appeal for me is not only the masses of shiny soldiers and the straightforward rules, but it is also the "look of the thing". In a classic game the abstraction of the game carries a beauty that is really a thing to behold...especially after having spent years in the "model railroad layout" style of gaming that admittedly also produces some amazing game experiences but sometimes is an expensive and time consuming direction to take in the hobby.

So for this post I thought it might be a nice break from AARs to post some basic ideas for producing "classic" wargaming buildings in short order with a minimum of headaches and a maximum of fun!

For this building project I decided to keep it simple with a basic building made of almost entirely of 3/16" thick balsa with all the details drawn on in a loose-but-convincing "old school" way. The resulting structure will work for both classic games as well as more detailed table set ups.

OK so here goes:

First, the base is cut from a 1/8" masonite (mdf) scrap that I had laying around. (my wife calls me a hoarder, but I think it's just a wargamer habit to be alert to that "hey I can use that" moment. The building I'm making here is going to be about 3"x5" so I'll cut this masonite scrap down a bit leaving a margin a bit larger than 3"x5" for some ground detail. The stuff is hard so a multi-pass cut with the knife will eventually do the trick.

The next step is to cut the four walls out of 3/16" balsa. I use a cheap metal square (available from "Micromark" online) to make the cuts precise. Essentially the two 5 inch sides are cut first with a height of 3". This will make a pretty good sized building and actually a bit larger than my usual buildings, but I'm planning on making this structure a row of town houses to represent  building block in a bigger city. In determining sizes I always assume figures will fit inside a lift-off building (a la Charles Grant) so I always plan the inside space carefully.

Next the gable ends pieces are laid out on a sheet cut to a 3" width. I learned a trick long ago in architecture school to lay the gables out so that you only have two cuts to make...(an "X") and the leftover triangles will be used as well.


OK so that's simple enough, and we have all the basic elements already cut and it's only been a few minutes of construction time!
Next we glue all the sides together...(I use "Weldbond" ...the very best white PVA glue...accept no substitutes...really... life will be much easier...:)... Glue the sides together off of the base so you don't get anything stuck to the base...and I use the metal square to keep everything squared up during the first few minutes of drying. Weldbond sets up to an initial strong tack really quickly so it makes the entire process more easy but it allows repositioning for a good while.

While the walls set up, I lay them over the base and mark out the line of the inside walls so I can then glue up some "ruined walls" in the interior. I normally use HO scale cork roadbed for the ruined walls but I was out of the stuff so I just randomly cut some more of the balsa and stuck it down.  I set the inside walls a bit off center so I could leave some base area for building entrances.


After that I cut two roof pieces of the same balsa (again normally I might use a thinner basswood for the roof...but for this project there was none on hand) and glued them to the angles of the gable ends. I also took the two extra triangular pieces leftover from the gable cuts and added them on the outside to beef up the gable profile on each end. Finally I took some think basswood and "edged" the roofline to get a bit more cleanness on the gable end.

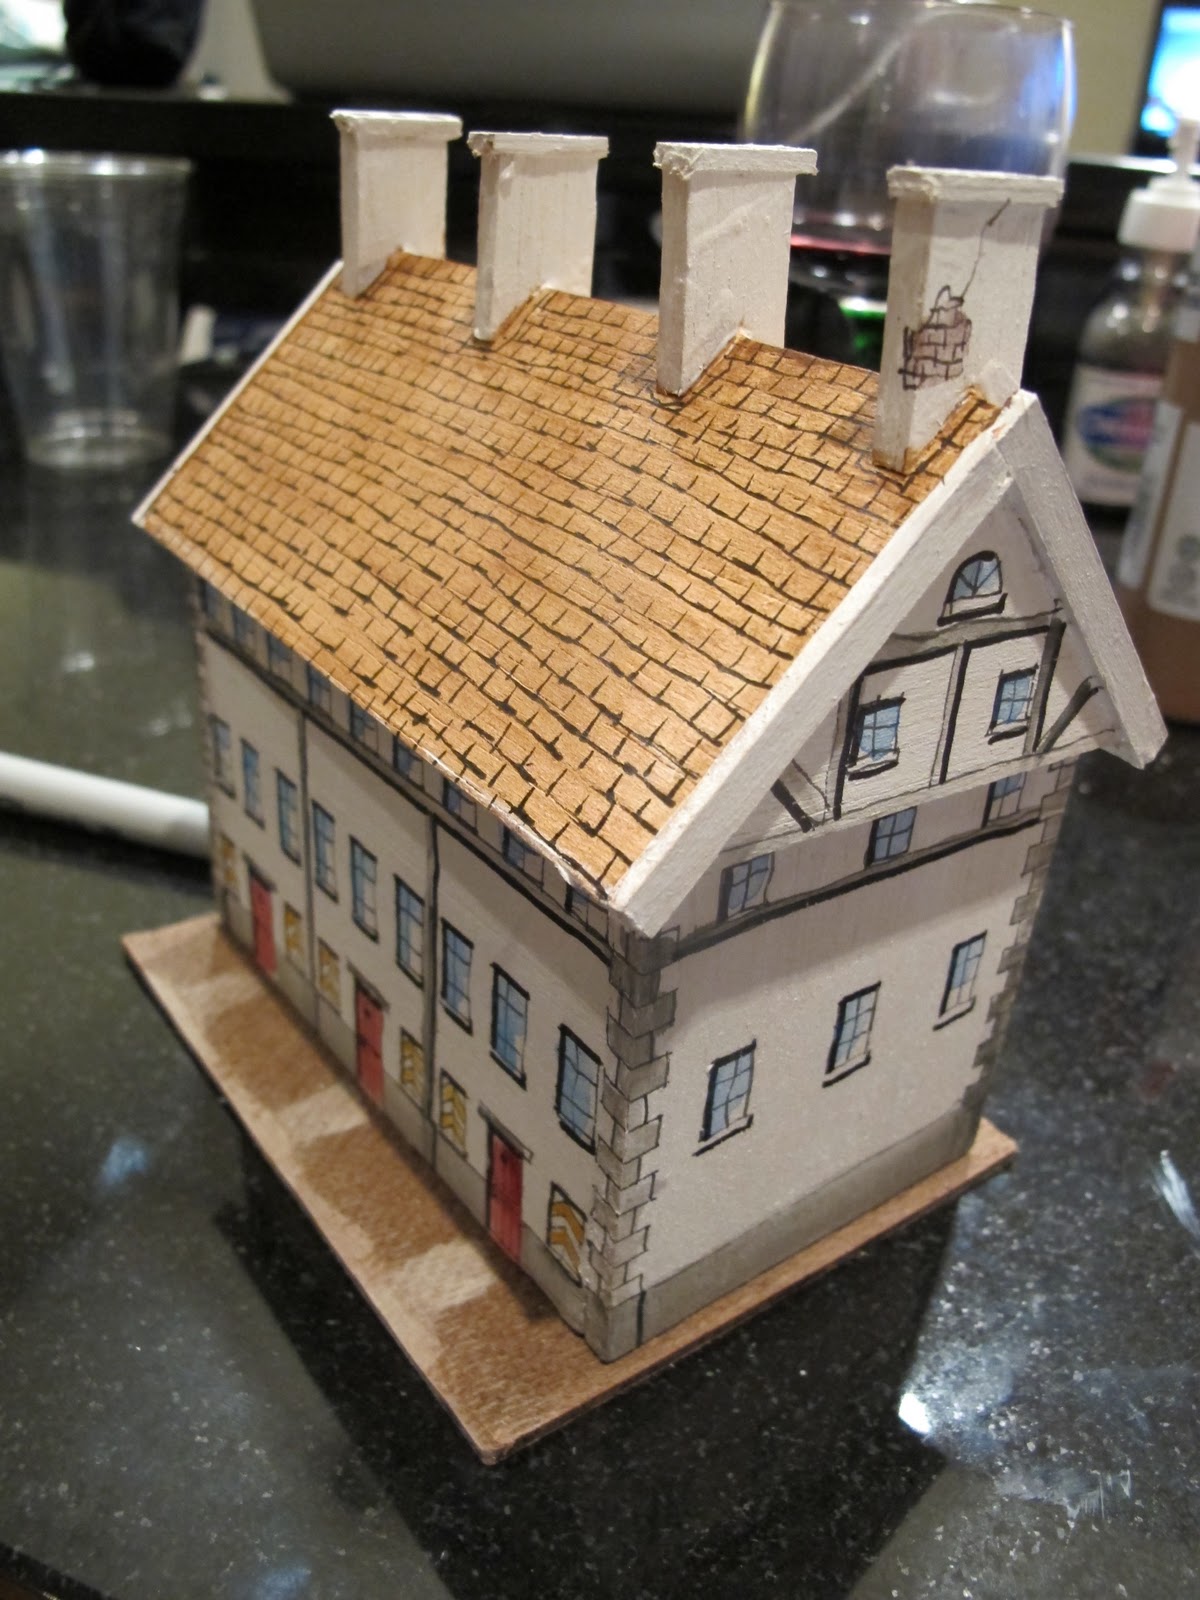
Then for a bit more detail I decided to add some chimneys to the roofline to give the building a townhouse scale. These were done in the same 3/16" balsa by cutting a strip about 1" wide and cutting 1-1/4" sections for the chimneys. between each two laid out on the strip I laid out a square to be cut out so the "chimneys" would fit on the angle of the roof.


So in this pic you can see the nearly complete construction of the townhouses. Still simple and ready for paint.


Here is the raw building next to some hussars escorting a coach and four...(the hussars are still in the painting stage)


Next is a coat of white acrylic paint to set the painting in motion....


The next stage involves drawing on the details/windows of the structure. In a classic wargaming manner, the drawing is purposely kept loose and is done with a fine waterproof marker (MICRON or UNIBALL pens are a good choice for this step). The waterproof part is important because you will be adding a few washes of color so you don't want that to kill your outlines.  Since I'm going for a townhouse, the building is divided into three sections to make the structure look like three townhouses.

 The gable ends are drawn...at this stage some period images are helpful to get the windows and details right...I used some tourist images of Prague to help dial it in...

One the outlines of the windows and such are drawn, shadows are indicated with a heavier line (I used a Sharpie pen)...check out my tutorial HERE on how that's done. Basically the technique makes the drawn building appear more three dimensional.


 Then thin washes of color define the roof, details and windows...and the building entrances on the bases are picked out with a tan color.

It's rough, but it looks right for a "Classic" wargame.

 The roof shingles are done with a Micron pen by first drawing the horizontal courses with a kind of "back and forth" motion of the pen so the line is a rough and varied.

 Then that is followed by the vertical lines of the shingles quickly "flicked' with the pen in alternating courses...it seems like a lot of work but it actually takes only about 20 minutes...


 I like to add some age to the buildings by showing spots where the plaster has flaked off...


...and finally after only a few hours of work, another building to add to the table!