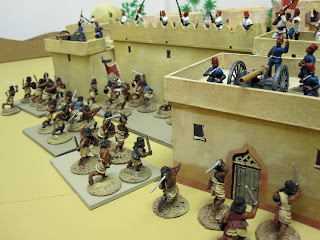
The valiant men of the Konigreich der Bleiherzen and the army of the Grand Duchy of Grolstein once again come to blows along the frontier between my two imaginary countries. For this battle I used one of the Table Top Teasers from the Charles S. Grant's scenario book published by Battlegames magazine to test run the new set of "Blackpowder" rules I just received from Warlord Games.
It's been a long while since these two implacable foes have faced off on the "green mile" here at the Lead Gardens and the arrival of Rick Priestly's new rules has inspired me to have a go at an 18th century battle after a long hiatus...
For this scenario, the men of the Konigreich are defending their borders along the river that divides the two countries. The Grand Duchess's troops are again testing the border defenses by attempting to force a critical frontier bridge. I followed the set up specs in the Grant teaser faithfully so the forces as per the published scenario (The Bridge At Kronstadt). The forces were about a brigade on each side with the Grolsteiners outnumbering the Bleiherzeners by about 2:1. The figures are my 25mm RSMs painted for each ImagiNation plus some additional Prussians and Austrians to fill out the armies.
First off, I'm not going to give a detailed review of the Blackpowder rules since there are some already complete reviews out there...but just a report of the salient points of play and my very first impressions of the rules. ( for a pretty exhaustive and accurate review go here...). What I was most interested in apart from the way the rules play in general, was the way my particular collection, based as per the classic Grant rules would be adaptable to the Black Powder system.

Grolsteiners move to capture Kronstadt in the distance.
In the early turns of this battle, the rules really started to show their colors almost immediately. One of the most important aspects of play are the command rules which give you a chance to issue orders to units under the various commanders in your army. The Grolsteiners had a cavalry brigade commader and a infantry brigade commander who served as CinC, while the Konigreich defenders were only commanded by a brigade commander (but with a higher command rating)...Unlike the popular Warmaster Ancients rules by Rick Priestly, these rules have a more subtle and speedy command phase that allows commanders to test against their staff rating by rolling 2D6 (usually between 7 and 9) to issue an order. The rules require that players state the orders out loud and that must be great fun in face to face play but since I primarily game solo, the idea that my wife might hear me shouting from my gaming space, "The Konigswald Dragoons shall advance at the charge and drive the enemy from the ridgeline!"...made me decide to just imagine saying the orders.The degree to which the command roll succeeds gives you the number of moves that the unit (or entire brigade) can perform. Thus single, double or treble moves are possible...or worst case the general rolls bad and nothing happens. This gives the game a really fast moving feel and cavalry given the right conditions can really fly across the table...all in all quite exciting! The authors state the games works best with large forces and big tables and I can see how on a very wide table the games could really be a blast. As it is I have an 8x5 foot table and this battle was played down the length so this battle would perhaps put a bit of design stress on the rules. But as it turned out everything worked great!

Grolsteiner hussars regroup while infantry columns ford a small stream to form on the far bank. (you can see my casualty markers leave much to be desired and the rules recommend casualty figures but I'm not quite there yet in the collection.)...the guys in the right hand infanty column look like they need to have that schnitzel ration cut...compared to the RSMs on the left...a bit hefty...but no matter, on to the fight!
My 18th century armies were designed to play Grant's "The War Game" so infantry units are 30 rank and file strong mounted individually but sit on magnetic stands (6 to a stand) so it was easy to adapt to Black Powder in terms of frontage. The rules recommend 240mm as the standard infantry line frontage for 28mm but the rules do not require any specific base scheme and if you keep within 25% or so of the recommended frontage, everything works just fine... I think the rules would work even with "exotica" like "Volley and Bayonet" basing with just a bit of tweaking.
Men of the Konigreich deployed along a ridge...with the intrepid and seemingly bulletproof Col. Gerlach and his Jagers holding a farm. (The rules do have the option of using commander character as a part of the game but it plays normally with just a staff rating for all commanders on a side.)
Movement in increments divisible by 6 so scaling down for a smaller table would be a snap as well. I'm going to use my 6mm Adler Naps using cms instead of inches and I think it will work just fine...in fact I spent the remainder of this snowed in weekend getting out my 6mm Naps and working out a scenario to play next with the rules.
Movement in increments divisible by 6 so scaling down for a smaller table would be a snap as well. I'm going to use my 6mm Adler Naps using cms instead of inches and I think it will work just fine...in fact I spent the remainder of this snowed in weekend getting out my 6mm Naps and working out a scenario to play next with the rules.

After an initial cavalry contest (which the rules handle very well...ie cavalry feels like cavalry...fast, deadly, but brittle) the cavalry of both sides retired to rally and regroup while the infantry lines formed up for the assault. The musketry ranges are comparable to Grant's classic rules,
 The lead regiment is ordered to charge the ridge, with a small unit of Grenadiers in support. flank and rear support is important in "Hand to Hand" combat. Combat for both shooting and melee is D6 based...a unit rolling D6s (usually 3 for shooting and 6 to 9 for hand to hand) with 4+ hitting...followed by a save based on the target's morale rating....giving the final hit total. Units usually can sustain 3 hits before going shaken and usually having to test for a break.
I found the all the combat rules very smooth and since I play solo very good in that regard as well. The minis are not removed...only hits marked on the units "stamina" rating... and for those out there who hate to remove those beautifully painted figures from the table ...this is the ruleset for you!

The first wave of infantry reach the defenders of the ridgeline and trade volleys...the Bleiherzeners are already weakened with a couple of artillery hits causing them to fall back in the subsequent "hand to hand" fight. The supporting grenadiers added weight to the Grolstein assault...
At this point I had to break from the battle but intend to finish it up this week. I think the rules are great and for the money you get a solid set of core rules that are of the toolbox variety so easy to manipulate...a really fun set of advanced and additional rules for period specific armies and weapons, several nicely presented scenarios that range from AWI to Naps to the 19th century Crimea and Brit colonials. This rule set will also serve for my colonials so I'm really pleased about that! And finally the rules boast some of the most beautiful miniature photography I've ever seen!...some of the images actually look like they were taken on the real battlefield...truly admirable and inspirational. And of course with such great images of minis present, the usual lust to try another horse and musket period collection looms large.


